Skip to content
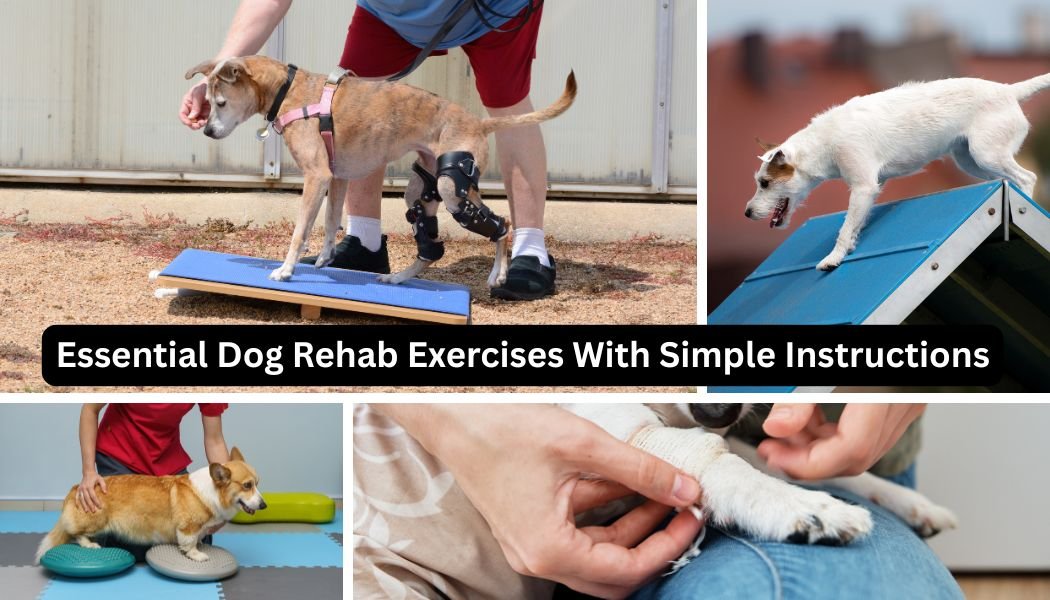
Table of Contents
Disclaimer – “The information in this article is for educational or informational purposes only and does not substitute professional veterinarian advice or consultations with veterinarian professionals.”
Helping Your Dog Heal, One Simple Move at a Time
When my dog struggled to stand comfortably after an injury, I realized how powerful the right rehab exercises can be. According to veterinary rehab specialists, targeted rehabilitation can reduce recovery time by up to 50% when done correctly. That’s huge.
The good news? You don’t need fancy equipment or professional-level training to get started. In this guide, I’ll walk you through essential dog rehab exercises with simple instructions that are safe, effective, and easy to follow at home. Whether your dog is recovering from surgery, managing arthritis, or rebuilding strength after an injury, these exercises can dramatically improve mobility, confidence, and overall quality of life.
Let’s help your dog move comfortably again, step by step.
Why Dog Rehabilitation Exercises Are So Important
I didn’t fully get the value of dog rehabilitation exercises until I watched a dog struggle to stand up after what was supposed to be a “successful” surgery.
The vet was happy, the X-rays looked good, and yet the dog moved like every step hurt. That was my first real lesson that healing on paper and healing in real life are two very different things.
How rehab supports healing after injury or surgery
After an injury or orthopedic surgery, the body wants to protect itself by limiting movement. I used to think rest alone was the answer, and honestly, that mistake slowed recovery more than anything.
Rehab exercises were designed to encourage healing tissues to adapt gradually, which is why things like passive range-of-motion exercises and slow leash walks were recommended early on.
What surprised me was how quickly circulation improved once gentle movement was introduced. Swelling was reduced, scar tissue softened, and joints stopped feeling “stuck.” When rehab was skipped, stiffness set in fast, sometimes within a week.
The role of controlled movement in reducing pain and stiffness
Here’s the part that felt backward at first. Movement actually reduced pain. It wasn’t wild movement, though; it was controlled, boring-looking stuff like weight shifting and slow sit-to-stand reps.
Controlled movement helps lubricate joints by distributing synovial fluid throughout the joint. I noticed stiffness was worst in the mornings or after long crate rest, which made sense once I learned how joints behave.
Once rehab routines were followed consistently, dogs were seen moving more freely within days.
Preventing muscle loss and joint deterioration
Muscle atrophy is sneaky. I once underestimated how fast muscle loss could happen, and by the time I noticed, strength had already dropped hard. Rehab exercises help keep muscles firing, even at low intensity, which protects surrounding joints from overload.
Weak muscles force joints to compensate. That compensation usually leads to arthritis down the road, especially in the hips and knees. Simple exercises like controlled leash walking on flat ground or assisted standing made a massive difference over time.
Improving balance, coordination, and confidence
This part hit me emotionally. Some dogs didn’t just lose strength; they lost confidence. You could see hesitation before steps, like they didn’t trust their body anymore.
Balance exercises like wobble boards, uneven surfaces, or slow figure-eight walks rebuilt that trust. Coordination was improved little by little, and confidence followed. Once balance returned, fear-based movement stopped being an issue.
When rehab exercises are recommended by veterinarians
Rehab isn’t just for major surgeries. I’ve seen veterinarians recommend it for ACL tears, spinal injuries, arthritis, hip dysplasia, neurological issues, and even obesity-related mobility problems. Sometimes it was prescribed before surgery to strengthen muscles, which honestly surprised me.
If a vet mentions physical therapy, hydrotherapy, or therapeutic exercise, it’s worth taking seriously. Those recommendations usually come after seeing long-term outcomes, not just short-term fixes. Rehab was often the difference between a dog just “getting by” and actually moving comfortably again.
Looking back, I wish I’d trusted rehab sooner rather than assuming time would fix everything. Time helps, sure, but guided movement does the heavy lifting. Once I saw pain drop, strength return, and confidence rebuild, there was no going back.
Safety Guidelines Before Starting Dog Rehab Exercises
I learned the hard way that good intentions don’t always equal safe rehab. Early on, I jumped into exercises I saw online, thinking “gentle” automatically meant harmless. That mindset caused setbacks, and yeah, that one stung.
When to consult a veterinarian or canine rehab professional
Before starting any rehab routine, a vet or certified canine rehab professional should be involved. I used to think I could skip that step for minor injuries, but every dog heals differently. Underlying issues like ligament damage, spinal compression, or joint instability aren’t always obvious at home.
Veterinarians usually recommend rehab after surgeries like TPLO, luxating patella repair, or spinal procedures. It’s also suggested for chronic conditions like arthritis or neurological disorders. When guidance was followed, progress stayed steady instead of going backward.

Recognizing signs of pain, fatigue, or discomfort
Dogs don’t always yelp when something hurts. I missed subtle signs early on, like lip licking, yawning, slowing down, or suddenly refusing an exercise. Those were red flags, even if no whining happened.
Fatigue looks different than pain. Shaky legs, delayed responses, or lying down mid-exercise usually meant it was time to stop. When sessions were pushed past that point, soreness showed up later.
Proper warm-up and cool-down importance
Skipping warm-ups felt harmless until stiffness became an issue.
A proper warm-up gets blood flowing and joints ready, which reduces injury risk. Simple leash walking for five minutes worked better than anything fancy.
Cool-downs mattered just as much. Slow walking and light stretching helped prevent post-exercise stiffness. When cool-downs were ignored, next-day soreness was almost guaranteed.
Ideal exercise environment (flooring, space, distractions)
The floor matters more than people think. Slippery surfaces caused hesitation and poor form, especially for rear-leg exercises. Rubber mats or textured flooring made everything safer and more confident.
Space should be quiet and controlled. Too many distractions led to rushed movements and sloppy posture. Rehab works best when the focus stays on slow, intentional motion.
How often and how long to perform rehab sessions
More isn’t better with rehab. I once overdid session length, thinking faster progress would follow. Instead, fatigue built up and recovery slowed.
Most rehab sessions worked best at 10–20 minutes, one to two times per day. Consistency beats intensity every time. Short, well-executed sessions produced stronger results than long, exhausting ones.
If I could go back, I’d slow everything down from day one. Rehab isn’t about pushing limits; it’s about respecting them. Once that mindset clicked, progress became smoother and safer.
Passive Range of Motion Exercises for Dogs
Passive range-of-motion exercises sounded way more technical than they actually are. The first time I heard “PROM,” I pictured complicated therapy gear and strict protocols. Turns out, it was mostly slow, careful movement and a lot of patience.
What passive range of motion (PROM) exercises are
PROM exercises involve moving a dog’s joints through their natural range without the dog actively helping. The muscles stay relaxed while the joint is gently flexed and extended. These movements are usually done while the dog is lying down, calm, and supported.
At first, it felt awkward doing all the work. I worried I was doing it wrong or missing something important. Over time, it became obvious that smooth, controlled motion mattered more than perfection.
Benefits for dogs with limited mobility
PROM is huge for dogs that can’t move well on their own. After surgery or injury, joints stiffen fast when movement is limited. These exercises help maintain joint flexibility and promote circulation without stressing healing tissue.
I noticed that the swelling went down faster when PROM was done daily. Muscles stayed softer, and joints didn’t lock up as much. For dogs with neurological issues or arthritis, comfort improved even when strength gains were slow.
Simple step-by-step leg and joint movements
Start with the dog lying comfortably on their side. Support the limb above and below the joint to avoid twisting. Then gently bend the joint until mild resistance is felt, never forcing it.
Hold for one to two seconds, then slowly extend the joint back to neutral. Each movement should be smooth and controlled, no bouncing. If the dog tenses up or pulls away, it’s time to stop.
Hips, knees, shoulders, and elbows are the most common joints worked.
Ankles and wrists are often forgotten, but they matter just as much. I learned that consistency mattered more than how many joints were covered in one session.
Recommended repetitions and pacing
PROM isn’t about speed. Most rehab professionals recommend 10 to 15 repetitions per joint. That number felt small at first, but it added up fast across multiple limbs.
Pacing should stay slow and steady. Each rep took about five seconds total. Rushing increased tension, which defeated the whole purpose.
Best use cases: post-surgery, senior dogs, severe stiffness
PROM shines in post-surgical recovery. It’s often started within days of surgery, when approved by a vet. For senior dogs with arthritis, it helped keep joints moving on bad days.
Severe stiffness responds well when sessions stay short and gentle.
I’ve seen big improvements from just five minutes a day. Sometimes, PROM was the only movement tolerated early on, and that was enough to start progress.
PROM taught me that small movements add up. It wasn’t flashy or exciting. But over time, those slow reps quietly did the heavy lifting.
Assisted Standing and Weight-Shifting Exercises
This section took me a while to appreciate, mostly because it looked too simple. Standing there, holding a towel under a dog’s belly, didn’t feel like “real rehab” at first. But wow, was I wrong about that.
Teaching your dog to stand safely with support
Assisted standing is exactly what it sounds like: helping a dog stand without fully supporting their own weight. Early on, I made the mistake of lifting too much, which turned the exercise into a free ride. The goal is support, not suspension.
I learned to let the dog carry as much weight as safely possible.
Your hands or a towel were used only to prevent collapse. Once I stopped overhelping, strength started coming back faster.
How weight shifting improves balance and strength
Weight shifting trains the nervous system as much as the muscles.
By gently shifting weight from one side to the other, balance reactions are retrained. This was huge for dogs recovering from surgery or neurological issues.
At first, movements were tiny. Even a half-inch shift made muscles fire.
Over time, those micro-adjustments added up to noticeable stability.
Simple side-to-side and front-to-back movements
Side-to-side shifts were the easiest place to start. With the dog standing, I gently guided their hips left, then right. Each shift lasted 2 to 3 seconds.
Front-to-back shifts came next. Weight was slowly moved toward the front legs, then back toward the rear. This helped rebuild rear-end strength, which is often the first to be lost.
I kept reps low, usually 8–10 per direction. If posture broke down, the session ended. Quality always beats quantity here.
Using towels or harnesses for assistance
A rolled towel worked surprisingly well as a support sling.
Placed under the belly or hips, it provided stability without restricting movement. Later on, a proper rehab harness made things easier and safer.
The key was adjusting tension constantly. Too tight, and the dog didn’t work. Too loose and confidence dropped fast.
Progressing as your dog gains confidence
Progress didn’t mean rushing. The first sign of improvement was confidence, not strength. Hesitation faded before muscles fully returned.
As balance improved, support was slowly reduced. Hands moved lower, pressure eased, and stance time increased. Eventually, assistance was barely needed.
This exercise taught me patience. Standing still doesn’t look impressive.
But it quietly rebuilds the foundation that everything else depends on.
Sit-to-Stand Exercises for Strength Building
Sit-to-stand exercises didn’t look impressive the first time I tried them. I honestly thought, “That’s it?” Then I saw how wiped out a dog could get after just a few good reps, and it clicked.
Why sit-to-stand is one of the most effective rehab exercises
Sit-to-stand mimics real-life movement. Getting up from the floor is something dogs do dozens of times a day. When that motion is weak or painful, everything else falls apart.
This exercise targets functional strength, not just isolated muscles.
It forces joints to move through a safe, natural range of motion. When done correctly, improvements showed up fast in daily mobility.
Step-by-step instructions using treats for guidance
Start with the dog in a controlled sit on non-slip flooring. I learned quickly that slippery surfaces ruin form and confidence. A small, soft treat held at nose level worked best. Slowly lift the treat forward and slightly upward.
That motion encourages a smooth stand instead of a hop.
Once standing, pause for one to two seconds before guiding back into a sit.
Reps stayed slow and deliberate. Rushing turned the movement sloppy. Calm guidance made all the difference.
Targeted muscles: hips, thighs, core
The real work happens in the hips and rear legs. Quadriceps, hamstrings, and glute muscles fire hard during the stand. The core stabilizes the spine, especially in slower reps.
I noticed rear-end strength improved before anything else.
Dogs stopped using momentum to stand. That was a clear sign muscles were actually doing the work.
Common mistakes to avoid
The biggest mistake I made was letting momentum take over. Fast pops into standing meant less muscle engagement. Another issue was uneven weight bearing, especially favoring one side.
Treat placement mattered more than I expected. Too high caused jumping. Too far forward stressed the shoulders.
How to adjust for small, large, or senior dogs
Small dogs benefited from raised platforms. A low step reduced joint strain during the sit. Large dogs needed wider stance spacing to maintain balance.
Senior dogs often need fewer reps with longer rest periods. I stuck with 5–8 reps instead of pushing volume. Comfort always came before numbers.
Sit-to-stand taught me to respect simple movements. It wasn’t flashy or complicated. But when done right, it rebuilt strength where it mattered most.
Controlled Walking and Leash Exercises
This was the phase where I had to seriously check my patience. Walking felt so normal that it was easy to forget it was actually rehab. But controlled walking turned out to be one of the most powerful tools in the whole process.
Benefits of slow, controlled walking for rehab
Slow walking forces proper limb placement. When the pace is reduced, muscles are engaged longer during each step. That extra time under tension is gold for rebuilding strength.
I noticed stiffness eased up after just a few minutes of steady walking.
Joint lubrication improves when movement stays consistent. Pain was often reduced more by slow walks than by complete rest.
How to use short leash walks for muscle rebuilding
Short leash walks aren’t about distance. They’re about posture, rhythm, and even weight distribution. I used a leash length of about 4 feet to maintain control.
Frequent stops helped reset form. If gait became uneven, we paused. Those pauses prevented bad habits from sneaking in.
Straight-line walking vs. gentle turns
Straight-line walking came first. It allowed muscles to work symmetrically without added balance challenges. Early on, this was all that was needed.
Gentle turns were added later. Wide figure-eight patterns worked best. Tight turns were avoided because they would stress healing joints.
Gradually increasing duration and difficulty
I made the mistake of increasing the time too fast once things looked good. That backfired, leading to soreness the next day. Progress had to stay gradual.
We added one to two minutes per session every few days. Inclines and slight uneven terrain came much later. Difficulty always increased before duration.
Surfaces to use, and surfaces to avoid
Surface choice mattered more than I expected. Grass, rubber flooring, and packed dirt provided grip and joint support. Concrete was acceptable for short durations but unforgiving. Slippery tile and ice were a hard no.
Loose gravel caused instability. The right surface made walking feel confident instead of cautious.
Controlled walking taught me restraint. It wasn’t about covering ground. It was about rebuilding movement, one careful step at a time.
Balance and Stability Exercises for Dogs
Balance training was the point where rehab stopped feeling mechanical and started feeling real. This was when I could actually see the brain reconnecting with the body. It was also the phase where I realized how fragile confidence can be.
Why balance training matters in rehabilitation
After injury or surgery, the body forgets how to stabilize itself. Muscles may regain strength, but coordination lags behind. Balance training retrains those tiny stabilizer muscles that don’t get much love otherwise.
I saw dogs hesitate before stepping onto uneven ground. That hesitation wasn’t weakness; it was uncertainty. Once balance work was added, movement became smoother and more intentional.
Simple balance exercises using household items
You don’t need fancy rehab gear to start. I used folded towels, couch cushions, and even a thick yoga mat. The goal was slight instability, not chaos.
One of the easiest exercises was having a dog stand with its front paws on a folded towel. That small change forced subtle weight adjustments. Those micro-movements added up fast.
Standing on uneven surfaces safely
Safety came first here. I always stayed close enough to support if their balance failed. Sessions were kept short, usually under 2 minutes each.
Uneven surfaces should challenge without overwhelming. If posture collapsed or panic showed up, the exercise stopped. Progress was built on calm success, not fear.
How balance work supports joint stability
Balance training strengthens muscles around the joints. That support reduces strain on ligaments and cartilage. I noticed joints felt steadier during walks after balance sessions.
Hips and knees benefited the most. Ankles and wrists also improved, which surprised me. Stability made everyday movement safer and more confident.
Signs your dog is ready for advanced balance work
The first sign was relaxation. Tension faded during exercises.
Breathing stayed calm. Weight shifts became smoother.
Recovery from minor stumbles was quick. That’s when more challenging surfaces could be introduced.
Balance work taught me to watch details. Big improvements came from tiny adjustments. It wasn’t flashy, but it changed everything.
Stretching Exercises to Improve Flexibility
Stretching was the part of rehab I underestimated the most. I thought strength work was the real hero, and stretching was just a nice extra. Turns out, skipping flexibility work made everything else harder.
The role of stretching in preventing stiffness
Stiffness sneaks up quietly. It shows up in shorter steps, slower transitions, and awkward posture. Stretching helps counter that by keeping muscles long and joints moving freely.
When stretching was done consistently, next-day soreness dropped. Movement looked smoother, especially after rest periods. Flexibility made strength usable instead of restricted.
Gentle stretches for legs, hips, and spine
Leg stretches were kept simple. I gently extended each limb until light resistance was felt. For hips, slow rear-leg extensions worked best.
Spinal stretches were subtle but effective. Treat-guided side bends encouraged natural movement. I avoided twisting or forcing any position.
How long to hold each stretch safely
This took some trial and error. Early on, I held stretches too long.
That caused tension instead of relaxation. The sweet spot was 15–30 seconds per stretch. Breathing stayed calm. If muscles tightened, the stretch was released early.
When stretching should be avoided
Stretching isn’t always appropriate. I avoided it during acute inflammation or visible swelling. Painful reactions were an immediate stop sign.
Right after intense rehab sessions, stretching was light or skipped. Warm muscles responded better than cold ones. Forcing flexibility never paid off.
Combining stretching with other rehab exercises
Stretching worked best after light activity. Short walks or balance exercises warmed tissues first. That made stretches more effective and comfortable.
I used stretching as a cool-down tool. It helped transition the body back to rest. When paired with strength work, progress stayed smoother and more consistent.
Stretching taught me patience. Flexibility takes time. But once stiffness eased, everything else improved faster.
Using Basic Equipment for Dog Rehab at Home
I used to think dog rehab equipment required a garage full of fancy gear. That belief stopped me from starting sooner than I should have. Once I actually got into it, most of the best tools were already in the house.
Towels, leashes, and household props
Towels were my go-to from day one. A rolled bath towel worked as a sling for assisted standing and walking. It gave support without locking movement in place.
Leashes weren’t just for walks. A short leash helped control speed during rehab walking. Chairs, couch cushions, and low steps doubled as tools for balance and strength.
When rehab balls, cones, or ramps are helpful
Specialized equipment has its place. Balance balls and wobble cushions were helpful once basic stability returned. Cones made controlled turning exercises more structured. amps were great for reducing joint strain. They helped with sit-to-stand progressions and safe elevation changes. I waited until confidence was solid before introducing them.
Keeping exercises low-cost and accessible
Rehab shouldn’t feel financially overwhelming. Most progress came from consistency, not expensive gear. Household items covered at least 80 percent of what was needed.
I focused on quality movement instead of upgrades. Money was saved by being creative. That mindset kept rehab sustainable long-term.
Equipment safety tips
Safety mattered more than creativity. Anything that slid, wobbled unpredictably, or collapsed was removed. Non-slip mats were used under all props. Equipment was checked before every session. Wear and tear caused failures when ignored. A calm setup prevented panic and injury.
How to progress without overloading your dog
Progress came in small steps. I changed one variable at a time, not everything at once. Duration increased before difficulty. When fatigue showed up early, intensity was reduced. Recovery days were respected. Overloading slowed progress every single time.
Using simple equipment taught me resourcefulness. Rehab didn’t need to be complicated. It just needed to be thoughtful and consistent.
How Often Should You Do Dog Rehab Exercises?
Timing was one of the hardest lessons for me in dog rehab. I thought more was always better, longer sessions, more days, but that just backfired. Recovery isn’t about sheer effort; it’s about consistency, pacing, and paying attention.
Ideal rehab schedules based on condition
The “right” schedule really depends on the injury or condition. Post-surgery dogs often need short, daily sessions at first, while arthritis management can be every other day. I learned that following a vet’s timeline prevented setbacks.
Some dogs respond better to multiple short sessions than a single long one. Even five-minute bouts of PROM or assisted standing added up if repeated throughout the day. Listening to the dog’s comfort level was more important than rigid schedules.
Daily vs. alternate-day routines
Daily sessions work best when exercises are low-intensity and mobility-focused. When strength or balance exercises were introduced, alternating days allowed recovery. I used to push daily sit-to-stand reps too hard, and soreness slowed progress.
Alternate-day routines helped prevent fatigue. Muscles are rebuilt while giving joints a break. That balance made long-term rehab sustainable.
Adjusting frequency as recovery improves
As strength, balance, and flexibility return, session frequency can shift. I started with three 10-minute sessions per day and gradually cut back to one 15–20 minute session. This encouraged independence without overworking healing tissue.
The dog’s energy, posture, and willingness to participate guided adjustments. Sometimes progress plateaued because the frequency was reduced too quickly. Tweaking schedules based on feedback was key.
Tracking progress and improvements
I quickly realized that notes were essential. Tracking reps, duration, and responses showed trends I’d otherwise miss. Even small improvements, like smoother sit-to-stand transitions, became clear over time.
Taking videos was surprisingly helpful, too. It captured subtle changes in gait, confidence, and posture. Progress tracking kept motivation high for both the dog and me.
When to scale back or pause exercises
Sometimes, less is more. Swelling, limping, fatigue, or refusal to participate meant it was time to pause. I learned to respect these signals rather than stubbornly push through. Illness or flare-ups also required breaks. Scaling back didn’t undo progress; it actually prevented regressions. Rehab is a marathon, not a sprint.
Getting timing right made a huge difference. Consistency, attention, and flexibility in scheduling were as important as the exercises themselves. Once I got the rhythm down, improvements happened faster and more safely.
Simple Exercises, Powerful Results for Your Dog
Rehabilitation doesn’t have to be complicated to be effective. By practicing essential dog rehab exercises with simple instructions, you can play an active role in your dog’s recovery journey. Small, consistent efforts lead to stronger muscles, better mobility, and a happier, more confident dog.
Always listen to your dog, progress slowly, and work alongside your veterinarian when needed. With patience and consistency, these simple rehab exercises can make a life-changing difference, one step, stand, and stretch at a time.
Key Takeaways: Essential Dog Rehab Exercises
- Dog rehabilitation exercises help dogs recover faster, reduce pain and stiffness, prevent muscle loss, and rebuild balance, coordination, and confidence.
- Rehab is effective for post-surgery recovery, arthritis, neurological issues, obesity-related mobility problems, and general strength building.
Importance of Rehab
- Controlled movement promotes healing by improving circulation, flexibility, and joint lubrication.
- Passive exercises prevent muscle atrophy and reduce joint stress.
- Balance and confidence are restored through slow, structured exercises.
- Early rehab can reduce recovery time by up to 50% when performed correctly.
Safety Guidelines
- Always consult a veterinarian or canine rehab professional before starting exercises.
- Watch for subtle signs of pain, fatigue, or discomfort.
- Warm up with light walking, cool down with gentle stretches.
- Perform exercises on safe, non-slip flooring in a quiet environment.
- Keep sessions short (10–20 minutes), consistent, and paced according to your dog’s condition.
Core Rehab Exercises
Passive Range of Motion (PROM)
-
- Gently move joints through their natural range without dog assistance.
- Helps maintain flexibility, reduce stiffness, and improve circulation.
- Recommended 10–15 repetitions per joint, slow and controlled.
- Best for post-surgery, senior dogs, or severe stiffness.
Assisted Standing & Weight Shifting
-
- Support the dog to stand safely, letting them bear as much weight as possible.
- Improves balance, rear-end strength, and coordination.
- Side-to-side and front-to-back weight shifts with towels or harnesses.
Sit-to-Stand Exercises
-
- Encourages functional strength in hips, thighs, and core.
- Use treats for guidance, slow, deliberate reps.
- Adjust for size, age, and recovery stage; focus on quality over quantity.
Controlled Walking & Leash Exercises
-
- Slow, short walks reinforce proper gait, posture, and muscle engagement.
- Gradually increase duration, introduce gentle turns, and select safe surfaces.
Balance & Stability Exercises
-
- Use household items like towels or cushions to create slight instability.
- Retrains stabilizer muscles and improves joint support.
- Introduce advanced balance work only when your dog shows confidence and stability.
Stretching & Flexibility Exercises
-
- Maintain muscle length and prevent stiffness.
- Gentle stretches for legs, hips, and spine, held 15–30 seconds, after light activity.
- Avoid stretching during acute inflammation or visible pain.
Using Basic Equipment
- Towels, leashes, chairs, cushions, and low steps are sufficient for most rehab routines.
- Optional tools: wobble cushions, ramps, cones, or rehab balls for advanced progress.
- Ensure safety with non-slip surfaces and regular equipment checks.
- Progress gradually—change one variable at a time and respect fatigue signs.
Exercise Frequency & Progression
- Daily short sessions for mobility-focused exercises; alternate days for strength or balance.
- Adjust frequency and duration as recovery improves.
- Track progress via notes or videos to monitor gait, posture, and confidence.
- Pause or scale back when swelling, fatigue, or refusal occur.
Key Takeaways
- Consistency, patience, and safety are more important than intensity or complexity.
- Small, regular exercises can restore strength, flexibility, and confidence in dogs.
- Always work alongside a veterinarian, especially post-surgery or with chronic conditions.
- Rehab is a gradual, cumulative process—each step, stand, and stretch counts toward full recovery.
FAQ Section
What are dog rehabilitation exercises?
Dog rehabilitation exercises are controlled physical movements designed to improve mobility, strength, balance, and flexibility in dogs recovering from injury, surgery, arthritis, or age-related weakness. These exercises support healing while reducing pain and preventing muscle loss.
Can I do dog rehab exercises at home without special equipment?
Many essential dog rehab exercises can be safely performed at home with simple household items such as towels, leashes, or non-slip mats. Exercises such as sit-to-stands, controlled walking, and gentle stretching require little to no equipment when performed correctly.
How often should I do rehab exercises with my dog?
Most dogs benefit from rehab exercises once or twice daily, depending on their condition and veterinarian recommendations. Short, consistent sessions are more effective than long workouts and help prevent fatigue or injury during recovery.
Are rehab exercises safe for senior dogs?
Rehabilitation exercises are especially beneficial for senior dogs when tailored to their abilities. Gentle strength, balance, and mobility exercises help manage arthritis, improve stability, and maintain independence when performed at a slow, controlled pace.
When should I stop dog rehab exercises and consult a vet?
You should stop exercising and consult a veterinarian if your dog shows signs of pain, limping, excessive fatigue, swelling, vocalization, or reluctance to move. Rehab should never cause discomfort, and adjustments may be needed for safe progress.
Disclaimer: This blog post contains affiliate links